Monday 30 October 2017

Mitsubishi J2M "Raiden" by Mark Jahsan

Received the Flying Papa's decal set for my contribution in the last contest and wanted to show it wasn't just tossed in the stash! 
I've built a couple of the old Tamiya Mitsubishi "Raiden", this was my first Otaki one, builds like all the rest, quick and easy. There's newer, better kits, but it still makes a nice model.
Done as one captured in Singapore I believe, there's a well-known pic of this and a stablemate over the Malaysian jungle.
While I appreciate the gift, the decals themselves were a little disappointing, with a weird pixelation:
I used the lettering, but replaced the roundels with some from the stash.
It still looks good from a distance though, and it's just a shelfsitter, a quickie build to finish something while I've been procrastinating on my bigger builds.

- Mark Jahsan -
Thanks Mark. Your "Raiden" looks lovely. Will complain to Flying Papa's and rest assured your suggestion for a future contest theme will be put into good use.


Friday 27 October 2017

Nakajima A6M2-N "Rufe" pt. 2 Yokosuka Kokutai

As we saw in the previous part, the second "Rufe" prototype was delivered on February 9, 1942 and five more pre-production aircraft were finished by the end of March. These were followed by the first production aircraft and all were delivered to Yokosuka Kokutai to train the first seaplane fighter pilots.
Yokosuka Ku has a long history as was the very first Navy kokutai organized as early as April 1916 responsible with pilot training and aviation research as well as development and improvement of aircraft. With the fast development of ground based aircraft during WWI, an airfield was built in Opama in 1926. The Yokaren programme started in Yokosuka in 1930 and two years later the Aviation Arsenal was established near the Yokosuka Ku base.
From the beginning seaplanes and pilot training played an important role in the unit with Yokosuka K5Y2 "Willow" as trainers followed by Nakajima E8N "Dave" and Mitsubishi F1M "Pete" in the reconnaissance role. Pilot training also included some aerial fighting so when the first "Rufe" arrived in Yokosuka, reconnaissance pilots were chosen to be trained with them. Original "Rufe" test pilot, Captain Nishihata Kiichiro, became the main trainer and was called "sodate oya" (grow up parent) or "umi oya" (sea parent or, more loosely translated, sea daddy). The tail marking of the Yokosuka Kokutai was the katakana " (YO).
 
There are few Yokosuka Ku "Rufe" photos.
Here's one from here
 
The tail numbers of two "Rufe" are visible: YO-180 in the foreground and YO-176 on the left side of the photo.
Another photo, from here, shows the same YO-180 with YO-173 in the background. 
 
Below is another photo from a vintage publication.
The tail marking is not visible but note the "80" on the front tip of the main float; a partial repetition of the tail number. That would mean that it's another shot of YO-180. It is very possible that other seaplanes had their partial tail number painted on the main float. 
 
The ground crew members wear the typical white one-piece uniform of the units stationed in the mainland, the blue cap of the IJN and black shoes. 
Of interest in all these photos is the metal dolly (or launching trolley) with the wooden vertical beams. Note the small stool in front of the dolly for better support.
 
Our good friend Devlin Chouinard has created artwork for all three of them.


Overall color is hairyokushoku and the red propeller warning band and the two red narrow lines for the dolly are all standard. Silver propeller and spinner with two red lines on the blade tips. The tail marking of YO-176 has been depicted as red by artist Nohara Shigeru in Model Art #510, 1998, but artist Ibukuro Toyohiko in "Zero-sen perfect guide" Gakken 2003, shows it in black. I tend to agree that the tail markings of Yokosuka Ku gray "Rufe" are all probably black. 
 
According to Minakami Senji (?) in Maru Mechanic #3 the "Rufe" were painted in overall "bright gray white" until Autumn 1942 but from that time onward they were with "dark green" top camouflage. There is one photo of a green Yokosuka Ku "Rufe" found in "Koku Janaru Besatsu - Taiheiyo Koku Sen", 1977, with tail number YO-181.

Wednesday 25 October 2017

Tachikawa Ki-36 "Ida" by Miro Herold

Hi everybody!
I would like to show you my new completed kit. After reading the Arawasi Eagle Eye Series, No. 1 with the  Ki-36 & Ki-51, I knew smart kits of both aircraft must be built. First I finished the Mitsubishi Ki-51 "Sonia" (HERE) and now the Tachikawa Ki-36 "Ida" is also done. I had many fun hours with it.
This Ki-36 belonged to the 45th Dokuritsu Hiko-Chutai (Independent Company). The unit operated 1944 from Chosen in Korea.
The kit is Fujimi in 1/72 and for accessories I used the canopy from Falcon, Japanese MG and bombs from Kora-Models, Decals from Flying Papa’s…and scratch built the open engine.
With many regards from Germany!
- Miro Herold -


Sunday 22 October 2017

Nakajima A6M2-N "Rufe" pt. 1

Not surprisingly, last month's modelling contest turned to a large degree to a "Rufe" contest with no less than half of the 16 models that took part being "Rufe" models. So, since she is one of the most popular Japanese floatplanes, being kited more than a dozen times, I set out to see what's out there regarding the development of the type, unit histories, first hand accounts and other important material commonly found on most other Zero-sen types. To my surprise there is very little apart from brief histories mostly based on R. J. Fancillon's "Japanese Aircraft of the Pacific War" published by Putnam, a few photos and many many models. It should be noted that except for the "Mitsubishi A6M2-N Rufe" written by Krzystzof Janowicz and published by Kagero there is no other single publication, in any language including Japanese, dedicated exclusively to the "Rufe" and usually the entries in books dedicated to the Zero fighter and its types are no more than 2-3 pages long.
So, in this series of postings we will try to put together as much as possible information on the Nishiki Suijo Sentoki (Type 2 Seaplane Fighter) or Nakajima A6M2-N especially from Japanese sources. 
 
Design and development
The Wikipedia entry is very brief:
"The A6M2-N floatplane was developed from the Mitsubishi A6M Zero Type 0, mainly to support amphibious operations and defend remote bases. It was based on the A6M-2 Model 11 fuselage, with a modified tail and added floats. A total of 327 were built, including the original prototype."
 
The second reason for the development of the "Rufe" (to defend remote bases) is correct while the first (to support amphibious operations) is not. Japanese floatplanes like the Nakajima E8N "Dave" and later the Mitsubishi F1M "Pete" were indeed employed in the ground attack role during landing operations but these two types were found not strong enough in the fighter role. Therefore  the Navy as late as 1940 decided that they needed a dedicated fighter seaplane that could provide air cover, not in amphibious operations, but in captured remote islands of the Pacific until airfields were finished and land based fighters could be adequately deployed. For this, Kawanishi was instructed to design and produce what would be the best seaplane fighter of WWII, the Kawanishi N1K "Kyofu". Since Kawanishi chose to experiment with various too advanced features like retractable stabilising floats and contra-rotating propellers and was taking too long to complete the first prototype, let alone put the new type into full production, the Navy decided to quickly put together an interim type of floatplane fighter based on the highly successful Mitsubishi A6M2. This is how the "Rufe" was originally conceived as a project. Mitsubishi was deemed way too busy with the production of the Zero and the development of the J2M "Raiden", so instead Nakajima was chosen as they were already building Zero fighters.   
The official order from the Navy to Nakajima for the development of the "Rufe" was issued in the beginning of 1941 and the project became to be known within Nakajima as AS-1. The main design engineer was Mitake Shinobu an experienced member of the Nakajima designing team who was involved in the development of the E4N, the Experimental 12-shi and the E8N  Reconnaissance Seaplanes (in Francillon he is mentioned as "Niitake").
The very first test flight of the first prototype was on December 8, 1941, on the first day of the Pacific War. Pilot was Captain Nishihata Kiichiro of the Kugisho and location was lake Kasumigaura. There were almost no stability or handling problems but during alighting the aircraft was sinking a little too much but this could be resolved by changing the flap angle during approach. Another concern was that during taxing when the seaplane would have to make a tight turn, there would be very high water resistance on the stabilizing floats if there was wind. Turning the aircraft using only the rudder was not enough and this turning problem on water could be rectified with the installation of a controllable fin on the main float. The aircraft was delivered to the Navy the same day.
The second prototype was delivered on February 9,1942 and five more pre-production aircraft were delivered by the end of March. 
 
Photo source: here.
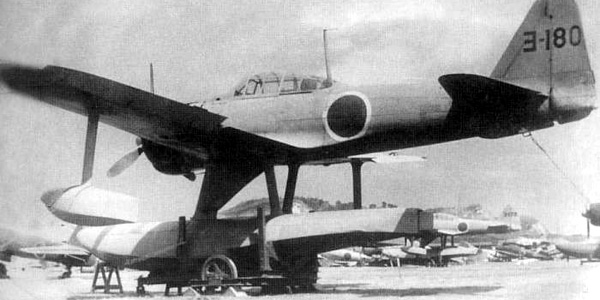
Bunrindo's "Japanese Military Aircraft Illustrated" Vol. 3, mentions that the aircraft in the photo above is "an A6M2-N undergoing tests with Yokosuka Kokutai. The aircraft is a preproduction machine, given a provisional designation of Model 1 Fighter Seaplane. The serial number is Nakajima No.913 and the production date recorded on the rear fuselage is 2-4-23, signifying April 23, 1942. Unlike the Reisen, the oil cooler was placed inside the central float pylon. The main float itself housed a 320 l. fuel tank. Note the small ventral fin added to the A6M2-N. Note also that, unlike the A6M2, the rudder has been extended to the bottom of the rear fuselage." 

Of particular interest is the following information mentioned in source 4. While Nakajima had all the detailed drawings of the Zero fighter from Mitsubishi, going through them and making modifications was deemed too complicated and time consuming. So instead a Zero fighter that had received battle damage and was sent to Nakajima for repairs was chosen and all modifications were done upon this aircraft which when completed became the first "Rufe" prototype. A very economical solution.
Another very interesting piece of information comes from source 3. Apart from the first prototype, another prototype called "0" was built and delivered to Kugisho to be used for strength tests. The aircraft was hoisted to a specified height and was left to fall on a pool used for testing. Only one member of the Nakajima design team, Tajima Atsushi, was sent to observe the strength tests and was mortified to see the seaplane handled in such rough manner. As source 4 says he "felt the pain to his own body".
During one of these tests, the main pylon was damaged and there was contestation whether it was due to poor design or defective material or poor welding during construction. The last was deemed to be the reason so it was a problem that could be easily fixed.
Another problem was discovered during testing of the second prototype in the end of March 1942. Some parts that were made by magnesium alloy (sources mention this material as "electron") were found to have rusted. These were the fuel tank access panels on the wing undersides and various covers of access hatches. These were replaced with duralumin and that problem too was resolved.
In February 1943 while the production aircraft were deployed it was found necessary to strengthen the fourth fuselage rib as well as the engine mount since after rough alightings engine mounts were often found cracked and the shock absorber rubber had to be replaced quickly.
Finally, in cold climates it was found that the 20mm cannons froze easily. So modifications were made to waterproof the inspection hatches.
 
In general the development of the Nakajima A6M2-N progressed very smoothly, the first completed aircraft being delivered only 11 months since the official order was issued. Production of the "Rufe" was undertaken in the Ota plant of Nakajima and later in the Koizumi plant.
 
Sources
1. Encyclopedia Vol. 5
2. "All the Regular Formed Aircraft in Japanese Navy" by Akimoto Minoru, Kantosha 2000
3. Maru Extra Vol. 51. Article by Suzuki Junjiro (member of Kugisho), 1977
4. "Kaigun Suijoki-tai" (Navy Seaplane Units), article by Tajima Atsushi, Kojinsha 2013     

Friday 20 October 2017

Nakajima Ki-43 "Hayabusa", Utsunomiya Army School

Three photo today from a vintage, December 1944, magazine featuring a Nakajima Ki-43 "Hayabusa" standing next to a Nakajima Ki-44 "Shoki" and a Mitsubishi Ki-46. The "Hayabusa" has the engine mount area panels removed offering a rare view of this area but note also the propeller and the spinner area. All the aircraft most unusually belong to the Utsunomiya Army School even though their markings are not visible in the photos.
Small quiz: what model is the "Hayabusa" in the photo?


Thank you all for your answers to the small quiz. Here's an illustration by master artist Watanabe Rikyu, (from No. 235, August 1976 issue of the defunct magazine Koku Janaru - Aviation Journal) illustrating the "Hayabusa" variants. In FAOW #65 there are more sub-types like "early production Model 2 Ko early" and "late production Model 2 Ko early" but I believe the illustration below is a handy, quick, basic recognition guide.  
 
 
Top left: Model 1, top right: Model 2 Ko early
Middle left: Model 2 Ko later model, middle right: Model 2 Otsu
Bottom right: Model 2 Kai, bottom left: Model 3 
 
So, I would say the "Hayabusa" in the photos is a "Model 2 Ko early".
 
Answering the question by David S about the correct pronunciation and writing of the word "Ko".
The correct Japanese pronunciation is very similar to this:
with no L in the end. Speakers of most European languages (Greek, Spanish, French, Italian, German...) and generally those with a knowledge of Latin have no problem to identify the sound although it should be a little longer than a simple "KO". 
For the issues regarding the transliteration of Japanese words in the Latin alphabet, check here:
Simply put, there is no "correct" way to write the kanji 甲 in Latin. "Ko", "Kou", "Koh" or "" are all possible and "correct". As you have probably noticed this blog prefers the first way with the exception of "Ohka".

Tuesday 17 October 2017

Kawasaki Ki-61 "Hien" by Dan Salamone

Attached are images from my recently completed 1/48 Hasegawa Ki-61I Hei. The natural metal finish is airbrushed Floquil Old Silver, the dark green mottle is Vallejo acrylics. Once cured the Floquil was wet sanded with automotive grade sandpaper. The Vallejo acrylics have relatively poor adhesion IMO, the scuffing/wear is from lightly rubbing with a soft cotton cloth.
Once you find the proper air pressure and paint consistency, the painting of the mottle goes rather well (but is time consuming).
All the other paints used were Gunze lacquers. Started this model in 2005 and just finished a few months ago!
 
- Dan Salamone - 


Sunday 15 October 2017

Artist - Vladimir Martinicky (6)

The latest work by Vladimir features a beautiful Kawasaki Ki-61 IIkai, of the 56th Sentai.
Enjoy!

Friday 13 October 2017

Modelling videos pt. 4

Another built of the Tamiya Kawasaki Ki-61 "Hien" (Tony), this time by "Scale-a-ton".
Here's the link to the original UTube video:  https://www.youtube.com/watch?v=-sSkZIFUBic
Check also the four much longer videos of his with more step-by-step details of the built.
 
Personally I think he is very brave to do the camo free hand, taking a big risk to spoil the whole model but the result is really pretty nice. My only objection would be the wrong IFF stripes (check here) common mistake made by modelers when they build their "Hien". A very nice looking model in every other respect.
 
 
As far as I know there are 3-4 techniques to replicate the camouflage pattern on the "Hien". One is to do the basic outline of the blotches by brush and then fill in the color by airbrush. Another, as seen by the previous Tamiya official video, is to do it by masking the wings. The free hand is another one but which one is your favorite or do you prefer a different way?

Michael Thurow
I have two ways to 'design' the blotches on JAAF aircraft: (1) I draw outlines by hand onto the basic colour with a weak soft carbon pencil (or with a plotting pencil after applying a layer of glossy clear). (2) I scan a good pattern from a 4-view drawing, print it to scale and copy it with a pencil onto the model surface via the good old carbon paper. Both methods allow errors to be easily removed with an eraser or wiped off with a wet cloth. Then I fill the forms with green colour of various densities either with hard or soft demarcation lines depending on the original camouflage.
Note that the blotches were usually avoiding the hinomarus (since they were factory applied) but were overlapped by command stripes etc. (field applied).
The result of my approach can be seen on my Toryu model - fuselage as per (1), wings as per (2).
http://www.aviationofjapan.com/2016/02/michael-thurows-148-ki-45-toryu.html

Michael Furry
I would free hand the camouflage pattern. Mottling on Luftwaffe and Italian subjects is accomplished in a similar fashion. The key's to the entire process are finding the correct paint consistency and air pressure. I would practice and experiment with thinning ratios and air pressure before attempting on the model.
 From what I noticed, the builder is using Tamiya paint, but does not discuss thinning ratios or air pressure. I have used Testors Model Mater enamels for well over two decades and have figured out the best thinning ratio and air pressure, but in many cases small adjustments must be made. One problem with Testors enamels is that once they are thinned past a certain ratio, they will not spray properly. I have not experimented much with Tamiya or any of the other acrylic lacquers, but have heard that they can be thinned to an extreme consistency and still spray with excellent coverage.
Model making is a skill; the more you try and experiment, the better you are at the skill.

Wednesday 11 October 2017

Aichi D3A1 "Val"

A photo from a vintage publication today of a Aichi D3A1 "Val" getting refuelled. A rather rare photo showing the canopy fully retracted. Note the dirty parts of the top wing surface where the crew members are stepping on. An early aircraft with Pearl Harbor era paint job. 

Sunday 8 October 2017

Modelling videos pt. 3

An interesting video by "Andy's Hobby Headquarters" featuring the built of a Kawasaki Ki-61 "Hien" (Tony) model by Tamiya.
Check the video description to see who built what. 
 
  
There are many different techniques and paints to replicate the NMF so often seen on IJAAF aircraft. Which method and paint has worked best for you? Alclad is the most often mentioned paint series but it is not always available in model shops. How about more readily available paints like Tamiya?

Michael Furry
I have always used Floquil old silver, bright silver, and platinum mist. These paints are easy to use and can be buffed with toothpaste, buffing powders, Rub n' Buff, pencil graphite or pastel chalk. Floquil silvers can be masked over without any problems and do not require any type of base coat or primer.
 Like most metal finishes, the plastic will need a light polishing using a cotton t-shirt or a well worn piece of scotch bright. Unfortunately, Floquil paints are no longer available but do show up from time to time at model shows or on trading boards.
I have not tried any other type of metal paint finish and my Floquil paint supply is limited, so I will need to find an alternative at some point in the future. I am curious to see what other modelers recommend or have tried.

Dan Salamone
Like what Michael said, Floquil enamels used to be my go to paints for NMF. I tried Alclad awhile ago and wasn't as pleased with the result. I just invested in AK Interactive Xtreme metal enamels but have yet to try them. There are videos on You Tube showing these paints and how quickly they dry and how you can mask over them. Seems like they may be the closest to the now discontinued Floquil enamels....

D. Chouinard
I have yet to do a good NMF, however once I have my modeling table back up, I may have a go at it.
Nice model in the video, but two things stood out to me: The prop stripes were way too far down the blades,and the there should be part of the IFF stripe color on the landing gear doors.
I did like the overall finish and the use of different shades of Alclad. Many ways of getting the metal effect....

Wednesday 4 October 2017

Mitsubishi G4M (Betty)

Two photos today from a vintage, May 1943, publication featuring a Navy Type 1 attack bomber or Mitsubishi G4M1 "Hamaki" (Betty) getting ready for the next mission somewhere in the South Pacific.

Sunday 1 October 2017

Modelling videos pt. 2

Two videos by Frédéric Mertès showing various techniques building a Nakajima Ki-84 "Hayate" (Frank) in 1/32. It seems that the hairspray technique works well with large scales. But how about in 1/72. Also, how about the painted hinomaru again in small scales?

Here's the link for the first video:
https://www.youtube.com/watch?v=z8G0y_9NYaI


And here's the link for the second video:
https://www.youtube.com/watch?v=3u_ARpPqZYU

 
Michael Furry
Regarding the hairspray technique, using this method is like anything else in model making, practice, practice practice. I have experimented with this technique a few times and it works quite well, but it can be overdone. I noticed Frederic used silver as the base coat. The silver base coat may be technically accurate, but is not as visually pleasing and often gives the impression of being "over weathered". I often use a darker color when simulating chips and wear as it is more visually pleasing to the eye and is not as apparent as straight silver.
Painting markings works in any scale. The key to painting markings is using very thin paint at low pressure and gradually build up the color, otherwise you can end up with have paint ridges or bleed through. The more color you add the darker the markings and the less color you add, the lighter the markings. You do not need a large quantity of paint to get good coverage. I started to paint markings on models years ago and only use decals when absolutely necessary.
 
Danilo
I use masks as well for painting hinomarus. I use frisket film to make a mask and a slightly modified drawing compass - the pencil end is substituted by a needle whose end has been previously modified with a grinding wheel to obtain a cutting edge. Or, you may use a small blade (by X-Acto?) and adapt it to the compass - of course the blade has to be perfectly sharp.
Using a compass allows to obtain a disc (mask) of very small diameter, which is especially necessary in 1/72 scale.
After that I agree that a bit of practice will give very satisfying results.....
 
Michael Furry
I run a small business with a long time friend producing paint stencils and masks. We use a CAD program to design the images and a plotter cutter to cut the designs. We prefer to use Frisket film because it is clear and positioning the stencil is much easier. We have also successfully designed and cut masks using Tamiya masking tape. Most of our customers prefer Frisket Film since it is clear and quite easy to position. If anyone is interested in paint masks or have questions, please feel free to contact me at: modelstencils@gmail.com
 
Barby jean
All serious modelers own a Silhouette Portrait nowadays, and without knowing how to use special tools like CAD programs, I do my own markings even if sometimes it is tricky. The hairspray technic works in any scale and, as stated above demands practice like any technic in modeling. I use Oramask and I am plenty satisfied with this product, which is the same one used by Montex. Best regards, Jean.