

While waiting for my brand new "Sally" to arrive directly from ICM, I'm starting this thread to present the building process and the final results of 4, yes four, different Nichimo Tachikawa Ki-9 "Akatonbo" (Spruce) in 1/48, in a variety of markings.

The first kit will be almost out of the box because this is the very first bi-plane I'm ever building. Let's see the instructions for the cockpit.

Here's what I did.


Didn't change anything at all. The parts have some flash and they are really fiddly and delicate to work with. Let's see what the painting instructions say.

All the metal parts should be painted "aotake", actually IJA blue-grey, and the instruments on the fuselage side, black. Before I add the seats I need to paint the cockpit. On second thought, perhaps it would be better to paint the instruments and the fuselage sides first before assembling the "cage". I will do that in the second "Akatonbo".


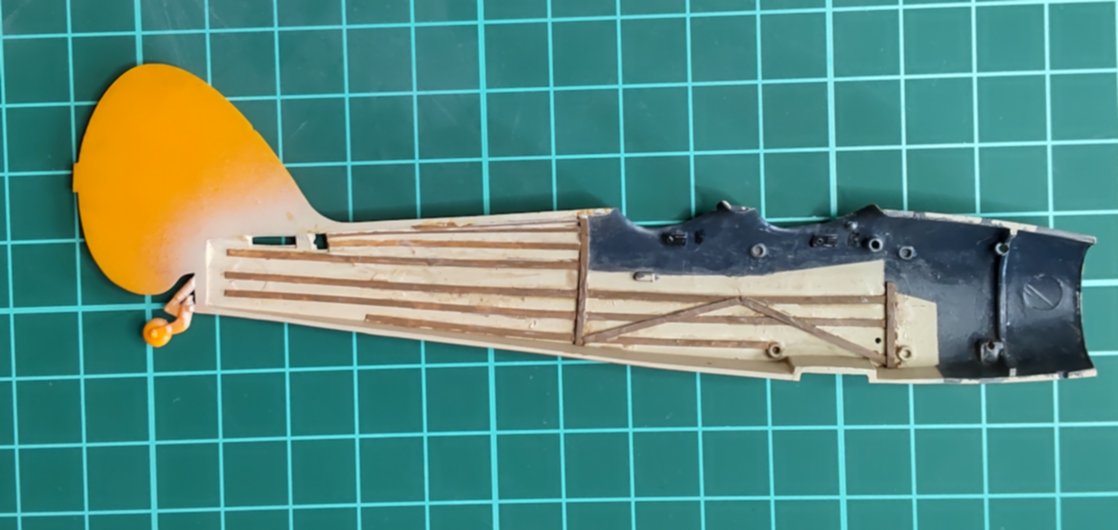
I used MrHobby H-54 Navy Blue for the overall interiour colour, which I find the closest out-of-the-bottle paint for IJAAF aircraft. Red-brown for the leather parts. Washed with black, gray and brown Tamiya panel line accent. Also, dry-brushed silver to show scratches and weathering.
All in all, I think it looks quite nice.
After I add the pilots I think there won't be many details visible; we'll see.
21/11 Update.
I spent the weekend and most of Monday morning working on the fuselage interior. I wanted to accurately paint it and the kit instructions were quite accurate; the metal parts of the interior should be painted in "aotake" blue and the fabric surfaces in flat white. There are no known photos showing exactly how the whole cockpit of the "Spruce" looked like but from two photos I found, I could confirm the kit's instructions. The photo below from NARA was one.

A close-up of the cockpit area reveals that there is a darker area corresponding to the metal part of the cockpit and a lighter area corresponding to the fabric.

The main problem is, the kit doesn't help at all and after a lot of trial and error, I managed to paint the interior somehow accurately. Not 100% happy with the result though and I will try to improve things with the next kit. Anyway, I used a mix of white with a little buff to show the canvas but, again, I'm not entirely happy with the results. If you have any ideas about a good off-the-bottle paint for canvas, leave a comment.
I also wanted to show, as best as possible, the stringers that held the fabric in place. I hadn't done this before and found the process particularly tedious. Keeping in mind that the cockpit frame is a very tight fit with the fuselage, I initially tried masking tape but it was very difficult to handle. I opted for sheet styrene strips of 0.38X1.00mm. They look okay but I have a feeling they should be thinner.
Anyway, the way the stringers were arranged was also a mystery but, again, the photo above helps a lot.

You will notice that the wooden stringers are in contrast to the darker metallic frame further inside the fuselage.
While the stringers in the rear of the fuselage are clearly shown in the photo above, I had again difficulty finding what the stringers around the cockpit looked like.
Two different NARA photos give somehow conflicting hints.


Are the vertical cockpit stringers straight, at an angle or in reverse V?
I found the bottom photo first and built the starboard side of my model accordingly. But then I found the top photo and built the port side differently; BS ofcourse, don't follow my example.
Here's what the interior looks like now before I attach the cockpit and close the two halves.

Naturally, I'm far from happy with the result. But it was a learning experience and I hope the next "Akatonbo" models to be better. The silver lining is that the way the cockpit is painted is fairly accurate (metal parts are in blue, the canvas is painted as such and the stringers are in wood colour) and once the pilots are in there, very little of the mess I made will be seen.
In the next instalment, I will build the cockpits of the three other "Akatonbo" correcting the various mistakes of the kit. This one was out-of-the-box, the next ones will be far more accurate and hopefully more good-looking.
7 comments:
Hi George,
I was just wondering why you used navy blue for the interior framing color, I would think it would be in a Aluminum or steal color, was it an anticorrosion paint color?
Regards,
Bob Deinhardt
Nice progress George, glad you found the time to build a model.
.
WK
Looking good.
All in Japanese markings?
Or perhaps something a little out of the ordinary (hint, hint)?
Thanks guys. Only this first will be in IJAAF markings
@Bob: generally speaking, it was the typical paint used to cover all interior parts and areas, including the cockpit, of most IJAAF aircraft. The official paint instructions of the "Willow", another similar trainer, we published with Eagle Eye #2, mention that all metal parts of the aircraft should be painted with red-brown primer and "aotake". So, yes, apparently, it was applied to protect the metal, not just for cosmetic purposes.
Hi George,
Great choice! Spruce is a rarity in the modeling world. I think your IJA blue-grey is spot on. The delicate cockpit details hold their own against the newest tooled kits we have today. I think Nichimo may have been a little ahead of their time. Your build has inspired me to pull my Spruce out of the stash.
Great work!
Mike
Thank you Mike
Great site! It's sad to hear interest is waning. You wouldn't know this from the difficulty of finding decals for IJNAAF and IJAAF aircraft. Most of my model collection consists of these aircraft and I always come here to see the latest. Thank you for your hard work!
Post a Comment